How to Install Keyboard Stabilizers?
Updated: 13/11/2023
276
Ever feel like your spacebar sounds a bit… mushy?
Anyone who types frequently understands the significance of a smooth and satisfying keystroke. But, larger keys such as the spacebar, Enter, and Shift can often feel shaky or unstable in comparison to the others. This is where the Best keyboard stabilizers come in! These stabilizer parts ensure these larger keys operate smoothly and consistently.
Installing stabilizers can significantly improve your typing experience by:
- Reducing noise: Keyboard Stabilizers help prevent those annoying noises from larger keys.
- Enhancing feel: They provide a more balanced and consistent key keypress across the entire board.
This guide will walk you through the process of Installing keyboard stabilizers step-by-step, discuss the different types available, and provide some troubleshooting tips.
There are two main types of stabilizer assembly: Plate-mount and Screw-in. We’ll briefly touch on which type works best for different keyboards.
What are keyboard stabilizers?
Keyboard stabilizers are components used in mechanical keyboards to ensure that larger keys, such as the spacebar, enter, and shift keys, operate smoothly and consistently. They prevent these keys from wobbling, shaking, or tilting when pressed, providing a stable typing and gaming experience.
Stabilizers are typically placed under these larger keys and are connected to them via a bar mechanism that balances the keypresses. Stabilizers consist of a stabilizer wire, stabilizer inserts, and stabilizer housings. They work by reducing the indirect movement of these larger keys, ensuring a more consistent and stable typing experience.
Understanding the Role of Stabilizers
Mechanical Keyboard stabilizers, often referred to as ‘stabs‘, are integral components designed to enhance the stability and consistency of keystrokes, particularly for larger keys. Understanding the anatomy and types of stabilizers is essential for selecting the right ones for your keyboard.
1. Anatomy of Stabilizers:
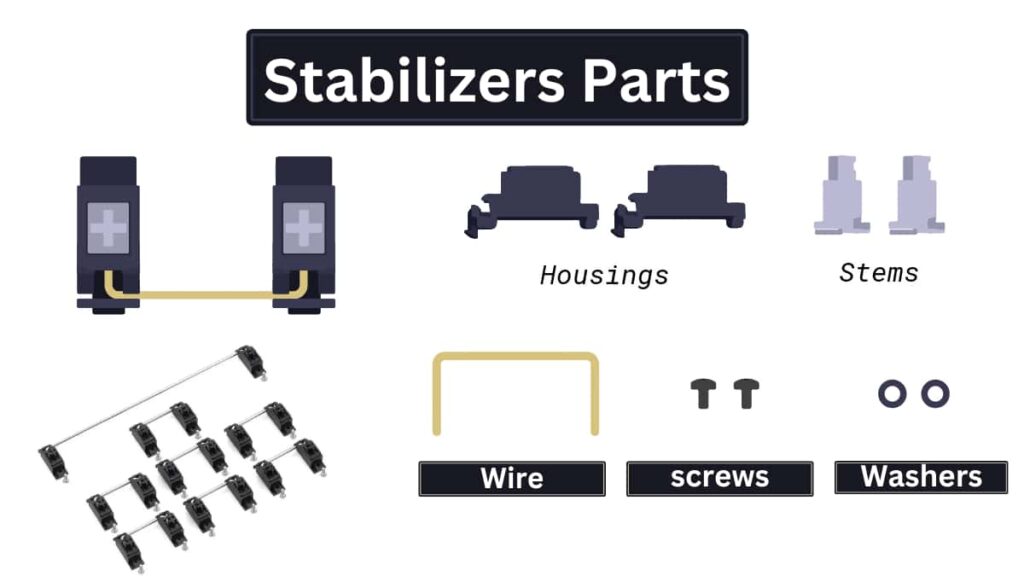
- Components: Consist of the slider, the housing, and the wire, which work together to prevent side-to-side movement and ensure smooth up-and-down motion of the keycap.
- Screw-in Stabilizers: Include housings, stems, a wire, screws, and washers, offering a more secure attachment to the PCB.
- GMK Screw-In Stabilizers: Come pre-assembled, simplifying the installation process.
2. Size Measurement: Stabilizer sizes are measured in units (U), just like keycaps. One unit (1U) equals the width of a standard key.
- Common Sizes: There are three main stabilizer sizes:
- 2U: This is the most common size, used for keys like Shift, Enter, Backspace, and Ctrl.
- 6.25U: This size is specifically for the standard spacebar on most keyboards.
- 7U: This is a less common size used for some non-standard, wider spacebars. You’ll likely only need this if your keyboard has a unique layout.
3. Mounting Styles: Cherry MX stabilizers are available in Plate-mounted, Screw-in, and Snap-in styles, with each providing different levels of security and ease of installation.
For a standard full-sized keyboard, you’ll typically need:
- 1x 6.25U stabilizer for the spacebar
- 7x 2U stabilizers for the Shift, Enter, Backspace, and Ctrl keys (one for each)
If you have a different keyboard layout (TKL, 60%, etc.), you might need fewer 2U stabilizers.
How many stabilizers do I need for my keyboard?
Knowing exactly how many stabilizers you need can be tricky, especially with all the different keyboard size out there.
We’ve got the ultimate sheet for popular keyboard layouts, including some unique ones you might not find elsewhere:
| Keyboard Layout | Number of 2u stabilizers | Stabilizer for Spacebar |
|---|---|---|
| Full-sized (100%) | 7 | 1x 6.25u or 7u |
| TKL (Tenkeyless) | 4 | 1x 6.25u or 7u |
| 60% | 4 | 1x 6.25u or 7u |
| Portico (65%) | 3 | 1x 6.25u |
| MiniVan | 2 | N/A |
| CandyBar | 4 (or 3) | 1x 6.25u |
| SP-111 | Up to 9 | 1x 6.25u or 7u |
| M0LLY | 7 | 1x 6.25u or 7u |
| Godspeed75 | 3 | 1x 6.25u or 7u |
| TKC1800 | 5 | 1x 6.25u or 7u |
Beyond This List: Can’t find your keyboard on this list? No worries! Most places that sell keyboards will usually tell you how many stabilizers you need in the description or instructions. You can also try searching online forums or communities for people who use the same keyboard as you. They might have already made a guide on how many stabilizers you need.
The Different Types of Keyboard Stabilizers
In this section, we will discuss the two main types of stabilizer keyboards: plate-mounted stabilizers and PCB-mounted stabilizers. We will cover the advantages and disadvantages of each type, as well as some famous brands and models.
1. Plate-mounted Stabilizers
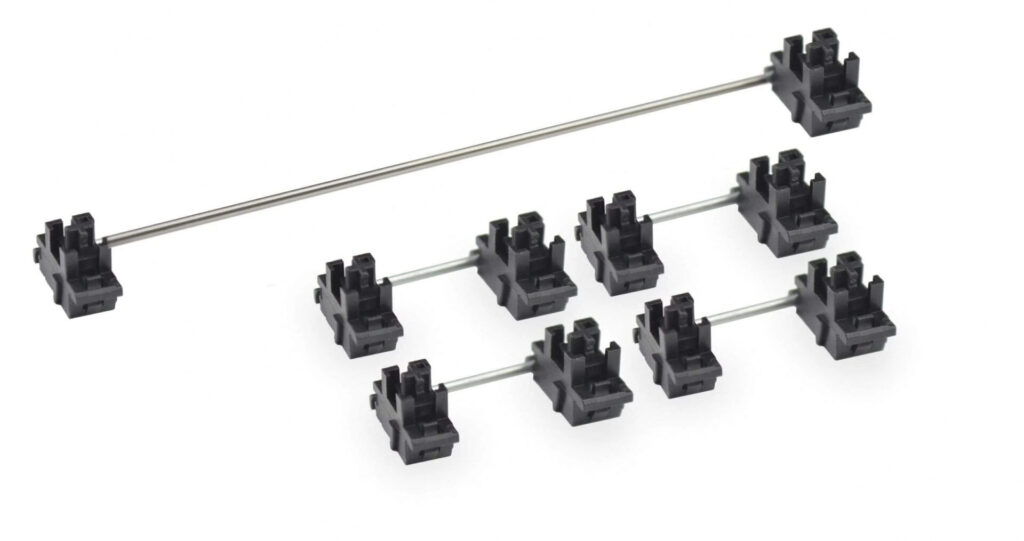
Plate-mounted stabilizers are the most common type of keyboard stabilizer. They are attached to the keyboard plate, the metal sheet supporting the keycaps. Plate-mounted stabilizers are generally easier to install than PCB-mounted stabilizers but can be noisier.
Plate-mounted stabilizers are typically made of plastic or metal and come in various colors to match keyboard builds. Some popular plate-mounted stabilizers include Durock, Cherry, and Costar stabilizers.
2. Screw-in Stabilizers
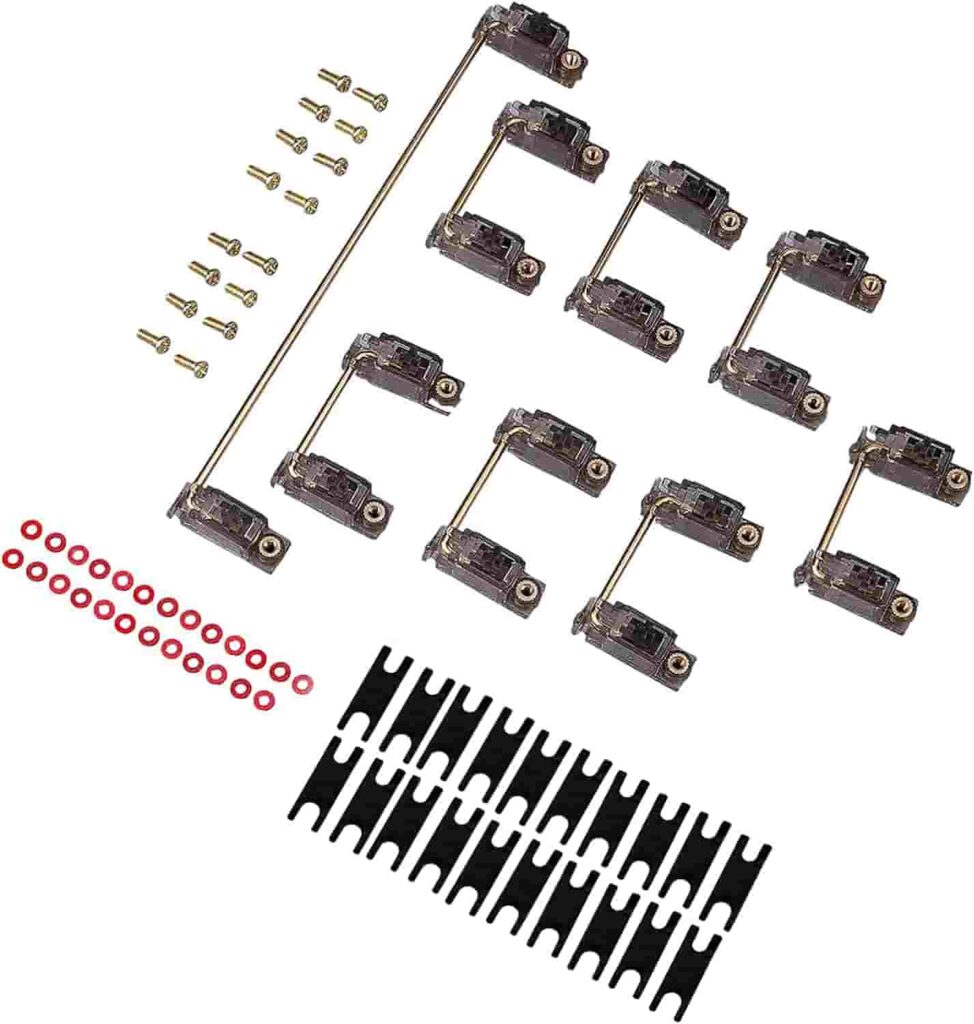
Screw in stabilizers are a type of mechanical keyboard stabilizer that is considered to be superior to the more common clip-in stabilizers. They are mounted onto the PCB (printed circuit board) of the keyboard using screws, which provides a more secure and stable connection. This can help to reduce key rattle and wobble, especially on larger keys such as the spacebar, Enter, Shift, and Backspace keys.
This guide will focus on installing plate-mounted stabilizers – a common choice among keyboard users.
Comparison of Plate-mounted and Screw-in Stabilizers:

Tools and Materials Needed for Installing Keyboard Stabilizers
Installing keyboard stabilizers is an essential step in building a custom keyboard. Choosing the right tools and materials ensures that your stabilizers are installed correctly and that your keyboard provides a smooth and enjoyable typing experience.
You can easily find the required components or complete stabilizer kits online or at local computer hardware stores.
| Tool or Material | Description | Necessary? |
|---|---|---|
| Screwdriver (size PH2 or T6) | For removing and installing screws | Yes |
| Keycap puller | For removing keycaps | Yes |
| Switch puller | For removing and installing switches (if necessary) | Yes |
| For lubing Stabilizers | For clipping stabilizer legs (if using plate-mounted stabilizers) | Optional, but recommended |
| Keyboard stabilizers Lube | For lubing stabilizers | Optional, but recommended |
| Band-Aids | To prevent oxidation and increasing conductivity | Optional, but recommended |
| Plate-mounted Stabilizers | For plate-mounted keyboards | Necessary if using plate-mounted stabilizers |
| PCB-mounted Stabilizers | For PCB-mounted keyboards | Necessary if using PCB-mounted stabilizers |
| Stabilizer Pads | For reducing noise | Optional, but recommended |
| Dielectric Grease | To prevent oxidation and increase conductivity | Optional, but recommended |
Removal of Existing Stabilizers (If applicable):
If your keyboard already has old stabilizers installed, remove them before proceeding. Here’s how:
- Flip your keyboard over and locate the screws holding the plate in place.
- Carefully remove the screws and lift the plate with the appropriate screwdriver, revealing the stabilizers.
- Pull each stabilizer upward using gentle force to detach it from the plate. Be cautious not to damage the switches or the keycaps.
- Set aside the old stabilizers for future reference or disposal.
Step-by-Step Guide to Installing Keyboard Stabilizers
Installing keyboard stabilizers is relatively straightforward, but you should keep a few things in mind to ensure they are installed correctly. This section will provide a step-by-step guide to installing keyboard stabilizers and some common troubleshooting tips.
1. Preparing the keyboard
Before you begin installing keyboard stabilizers, it is essential to prepare the keyboard.
- Remove all of the keycaps from the keyboard using a keycap puller.
- If you are removing and reinstalling switches, use a switch puller to remove the switches from the keyboard.
- If using plate-mounted stabilizers, clip the stabilizer legs to the correct length using stabilizer clippers.
- Apply a small amount of lube to the stabilizer stems and housings. This is optional but will help create a smoother typing experience.
- Apply a small amount of dielectric grease to the contacts on the stabilizer stems. This is also optional, but it will help to prevent oxidation and increase conductivity.
2. Installation of New Keyboard Stabilizers
Now that we’ve prepared the groundwork, let’s install the new keyboard stabilizers. Follow the steps below:
Plate-Mounted Stabilizers Installation:
- Place the stabilizer inserts onto the PCB or film beneath the plate. Align them with the designated holes to ensure an accurate fit.
- With your fingers or a pair of tweezers, position the stem of each stabilizer into the corresponding insert. Make sure the stabilizers are securely inserted and do not move freely.
- Gently press down on the stabilizers to ensure they are firmly seated in the inserts.
PCB-Mounted Stabilizers Installation:
- Begin by inserting the stabilizer inserts into the designated slots on the PCB. Ensure proper alignment, as this is essential for optimal stabilizer performance.
- Carefully secure the stabilizer wires into the inserts, ensuring they fit snugly. Use wire cutters to trim the wire length if necessary, but leave enough for proper stabilization.
- Double-check the alignment of the stabilizer wires to ensure they are parallel to the PCB and not twisted or bent.
Tips and Tricks to Ensure Stability:
As you install the stabilizers, keep the following tips and tricks in mind to achieve the best possible keyboard stability:
- Check for equal critical alignment and smooth vital actions throughout the installation process.
- If you encounter any instability or key wobble issues, ensure the stabilizers are appropriately inserted and secure.
- If you’re unfamiliar with the keycap removal process, consult your keyboard’s manual or online resources before proceeding.
Testing and Fine Tuning:
Now that your keyboard stabilizers are installed, it’s time to reconnect your keyboard and test the results:
- Plug in your keyboard and power it on.
- Test each key individually on our keyboard tester tool to ensure they register correctly and do not wobble.
- If you notice any stability issues or key wobble, revisit the stabilizer installation and make necessary adjustments and corrections.
Conclusion:
Great job! You’ve just put in keyboard stabilizers to make your typing better. This careful installation will make a big difference by giving you smoother keystrokes and less wobbling. If you have any problems, you can always look at this guide or find more help to fix them. You can also try out some advanced options to customize your typing experience. Enjoy your improved typing and keep on typing happily!
Which keyboard keys have stabilizers?
The following keyboard keys have stabilizers:
- Spacebar
- Shift keys (left and right)
- Enter key
- Backspace key
- Plus, key on the number pad
- Enter the key on the number pad.
How to Install Keyboard Stabilizers?
Adding stabilizers to your mechanical keyboard enhances typing on larger keys like the spacebar and Enter. Here’s a simplified guide:
- Prepare: Unpack stabilizers (housings, stems, wires).
- Assemble: Snap stems into housings, then attach wires securely.
- Mount: Depending on the stabilizer type (screw-in, clip-in, or plate-mounted), secure them to the PCB or plate.
- Finalize: Install switches and keycaps, ensuring a snug fit.
For a detailed guide with pictures, check out the “Installation of New Keyboard Stabilizers” section in the article!
How to remove keyboard stabilizers?
Removing stabilizers is often the first step when replacing them or modifying your keyboard. Here’s a quick guide:
- Flip Keyboard: Locate the screws holding the plate in place.
- Unscrew & Lift: Carefully remove screws and lift the plate to reveal stabilizers.
- Detach Gently: Use gentle force to pull stabilizers upwards, detaching them from the plate.
Pro Tip: Take pictures during removal for easier reassembly!
How to Lube Keyboard Stabilizers?
Lubing stabilizers reduce unwanted noise and create a smoother typing experience. Here’s a basic overview:
- Gather Supplies: You’ll need lube (focus on Krytox 205g0 for beginners) and a brush.
- Open Stabilizer: Carefully disassemble the stabilizer housing to access the stem and pole.
- Apply Lube: Apply a thin coat of lube to specific points (refer to online tutorials for details).
- Reassemble: Put the stabilizer back together and enjoy the quieter typing experience!
Note: Lubing requires some disassembly and can be a bit advanced. Consider practicing on a single stabilizer first.
How Do Keyboard Stabilizers Work?
Stabilizers are those hidden heroes under the larger keys on your keyboard (spacebar, Enter, Shift, etc.). They ensure these larger keys
- Maintain Balance: Prevent the keycap from tilting or wobbling when pressed.
- Travel Smoothly: Enable a consistent and even keystroke throughout.
In essence, stabilizers contribute to a more stable and enjoyable typing experience.
How many stabilizers do I need?
The number of stabilizers you need depends on your keyboard type. A standard full-size keyboard has seven stabilizers. A 60% keyboard has four stabilizers.
Do all keys have stabilizers?
No, not all keys have stabilizers. Only the larger keys, such as the spacebar, shift keys, and enter keys, have stabilizers.
Do stabilizers make a difference?
Yes, stabilizers make a big difference in the typing experience. They help to keep the larger keys stable and prevent them from rattling. This results in a smoother and more enjoyable typing experience.
What is the best type of keyboard stabilizer?
The best type of keyboard stabilizer depends on your personal preferences. Some people prefer plate-mounted stabilizers, while others prefer PCB-mounted stabilizers. Plate-mounted stabilizers are more common and easier to install, but PCB-mounted stabilizers are generally considered more stable and quieter.
Please Write Your Comments